What is data migration?
In simple terms, it means transferring a certain amount of data from one storage, platform, or system to another, with one or both of them being Salesforce-based. Salesforce data migration is a common task that occurs both in daily admin operations in the CRM and in large strategic business processes. This is also a complex data migration process that requires dealing with large volumes of data and different data structures.
Act 1. Choosing the right data migration tools
The data migration tools you choose are just as important as the process itself. A solid data migration software will save a great deal of time and resources, and prevent unnecessary errors.
Here are a few points you should consider when choosing a data migration tool for data migration in Salesforce:
- The majority of your data will be in .xlsx or .csv, so the tools should support these formats.
- The tools have to provide you with the ability to handle large volumes of data.
- The tools should be able to perform bulk operations within Salesforce.
Some professional recommendations from our dev team include:
Salesforce Inspector + Excel
Microsoft Excel is exceptional in dealing with data, and it’s a great data migration tool in Salesforce. It supports all the needed data formats, the data is displayed in a readable table, which you can sort and filter, and formulas are great for data transformation and linking related records.
Salesforce Inspector Chrome extension, on the other hand, provides you with a good and convenient Salesforce interface, allowing you to easily work with the database and manage Salesforce data import. The best part is that Salesforce Inspector supports Excel data format. It means you can omit the pile of intermediate import/export files and copy data directly into Excel instead. Then, from Excel, you can transfer it right into Salesforce Inspector, forming a lightweight data migration pipeline.
SFDX Data Move Utility
SFDX Data Move Utility (SFDMU) is an SFDX plugin created specifically for Salesforce to Salesforce data migration. Its features are well documented, and it can handle related records migrations. It’s one of the most reliable Salesforce data migration tools for developers.
Programming languages
With sufficient knowledge of almost any programming language, you can easily apply it in data migration projects. You can write a script that transforms the data, handles related records, and uses the Salesforce REST API to communicate with Salesforce.
This approach provides you with the best flexibility possible and allows you to automate the whole process. It is, however, the most complex to use, as it requires specific skills and may take up a lot of resources. It’s worth considering if you plan to perform multiple migrations.
Act 2. Preparing the Salesforce data migration plan
To achieve the desired outcome, a good amount of time should be allocated to planning the data migration strategy. The first step of preparation includes analyzing business data and understanding the level of its complexity.
Then, you’ll need to go through the target Salesforce data model to identify the desired future structure and the various relationships between objects that need to be taken into account.
It’s at this point that you’ll need to select the right data migration tool.
After that, you can start laying out the data migration pipeline, describing where you will take source data, how you will transform and map records, and how you will insert them into the target environment.
Reviewing the source data
First of all, let's take a look at the source data to understand its structure, anticipate data migration challenge, and refine your data migration checklist. The table below shows a common example of old data that should be imported into Salesforce. We will use this data set as an example in the following parts of the article. Please note that in a real migration scenario, you will have to deal with hundreds or thousands of records, and the number of columns will be much greater.
Defining the data migration scope
Let’s assume that data migration planning is done and you were told that the data should be imported as Account, Contact, and Contract (those objects are selected as examples, it could be any set of standard/custom objects) records and that corresponding custom fields were created.
Given the requirements, you can now summarize that:
- You need to move a set of company records;
- You need to move a set of customer records;
- You need to move a set of contract records;
- Customer records should be linked with the company records;
- One company record can have multiple related customer records;
- Contract records should be linked with the company records.
Analyzing your Salesforce data model
Now take a look at the target environment. As per requirements, you need to import data as Account, Contact, and Contract. Here’s a visual representation of a sample destination Salesforce data model.
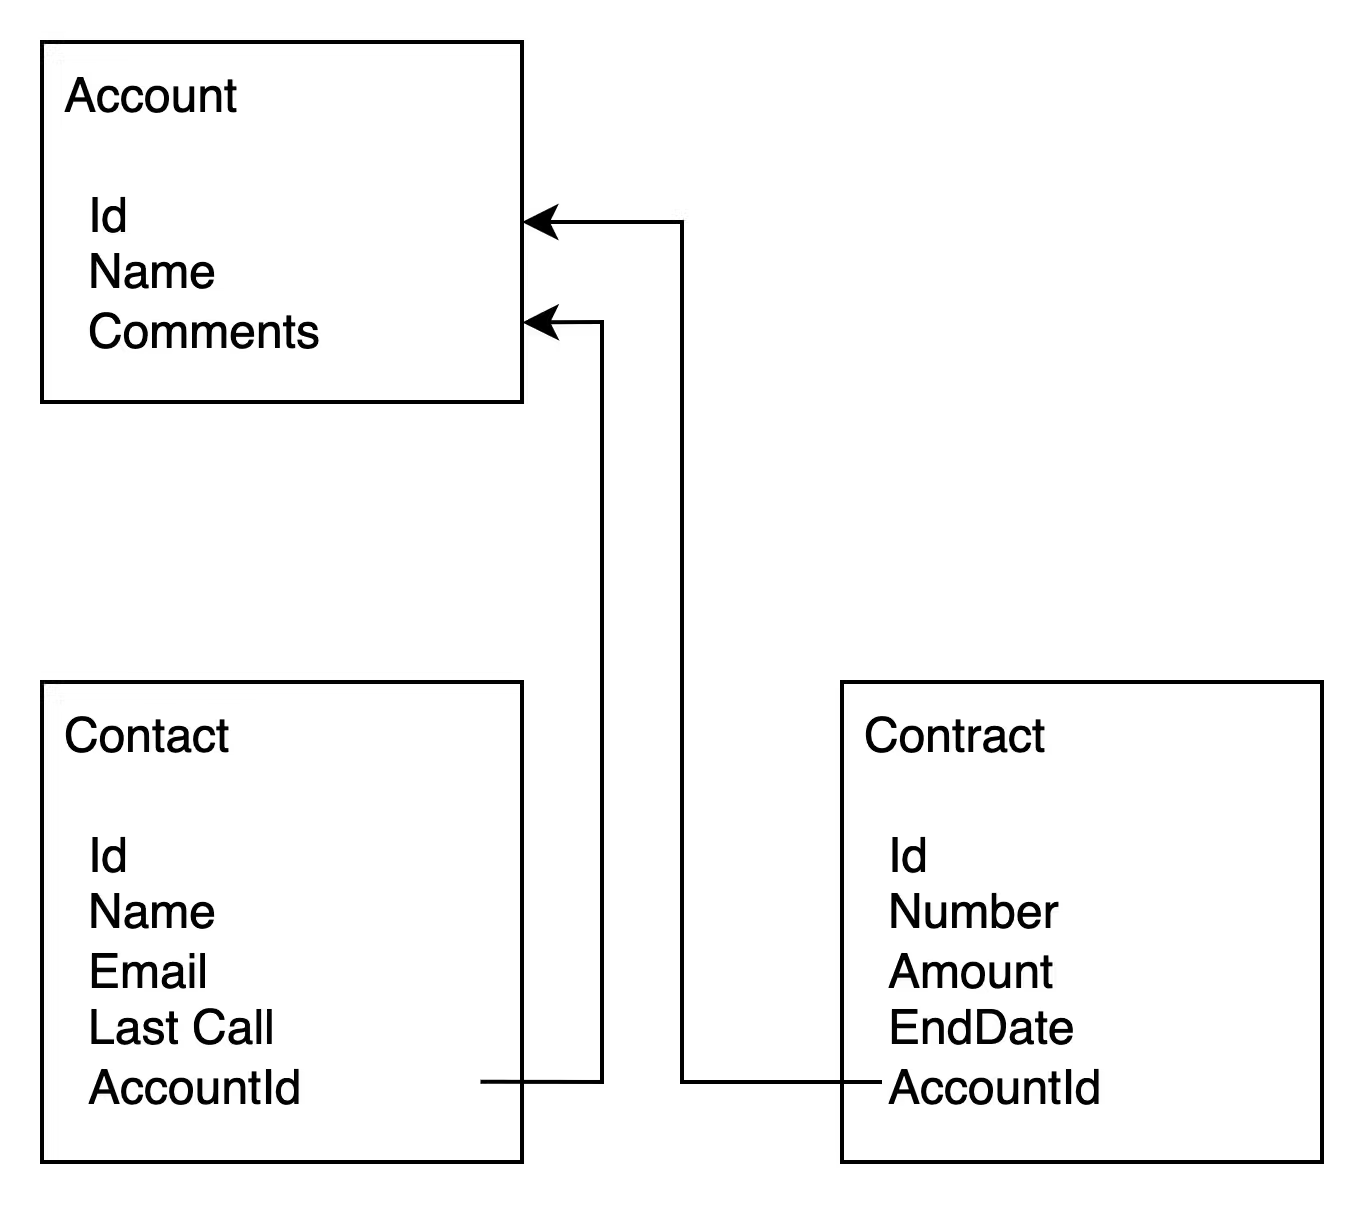
It is quite simple – you have one parent object (Account) and two independent related objects (Contact and Contract). However, if you compare it with your source data, you’ll notice that they are completely different. What to do?
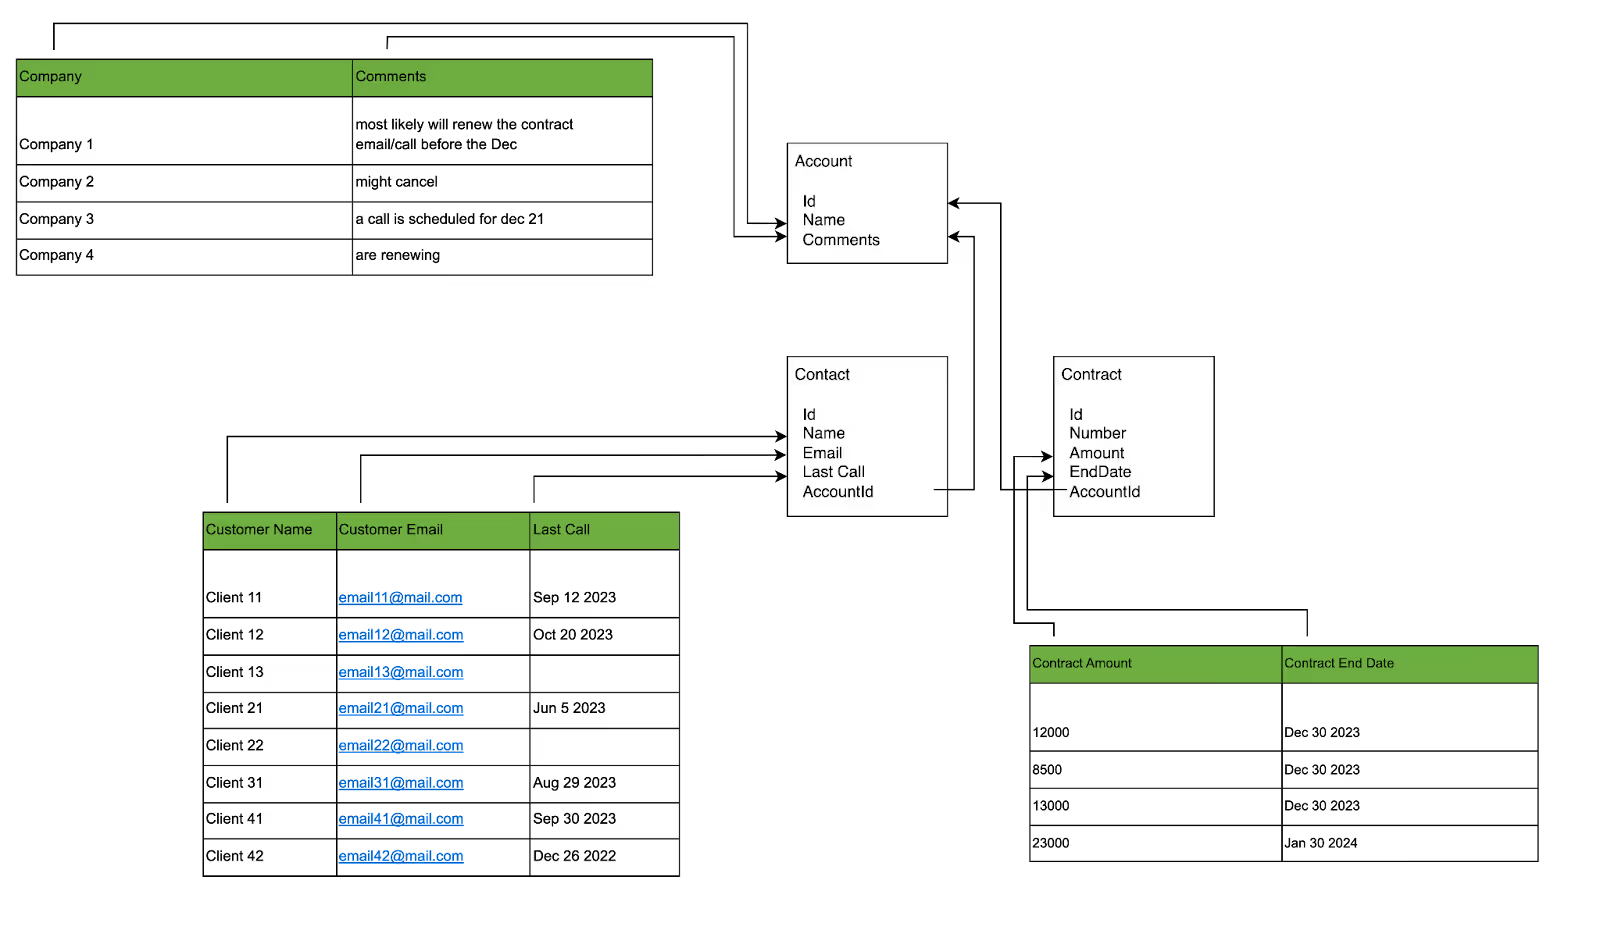
As you cannot import data in its current state, you’ll need to transform it.
Separate the big table by columns and group those columns by their destination:
- The Company and Comments columns will go into the Account;
- The Customer Name, Email, and Last Call look like they will fit into the contact section;
- The Contract Amount and End Date are self-explanatory.
By doing that, you’ll end up with 3 separate tables:
Accounts:
Contacts:
Contracts:
Act 3. Migrating records with relations
With all the preparation done, you can start the data migration process in Salesforce. Now you can match your data with the desired data model, and all the data should fit perfectly.
However, a crucial field is missing – AccountId. It’s one of the most common data migration challenges.
Troubleshooting
As a result of splitting the source data, the connections between records were lost. Also, there is no ID column for Companies in your data – we have to get it from Salesforce.
It comes down to two key points.
- Insert data gradually to obtain IDs for populating lookups in the child records
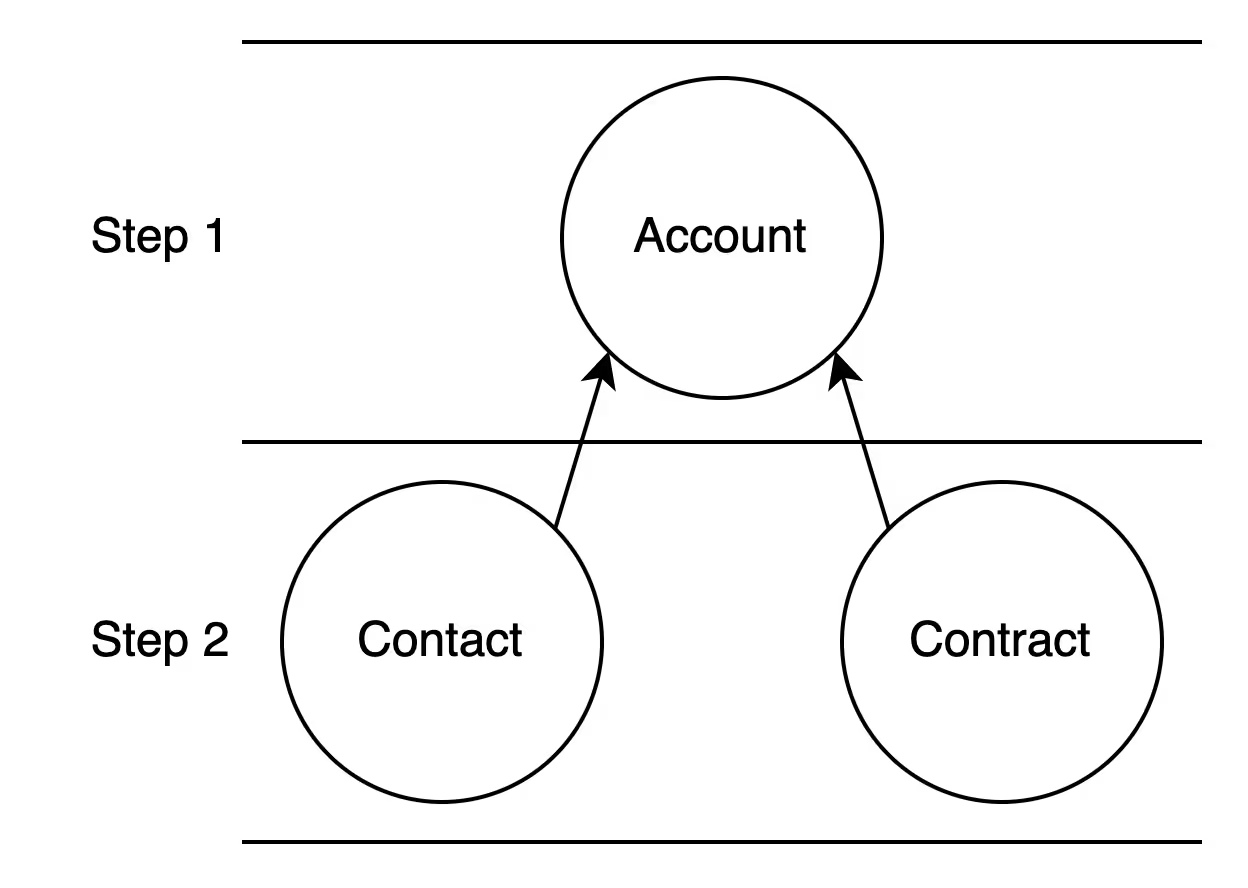
To determine the order for uploading the data, you need to look at how many parent records each object has.
The Account does not have parent objects, so it will be first:

Contacts and Contracts have a shared parent record – the Account, hence they should be uploaded after the Accounts.
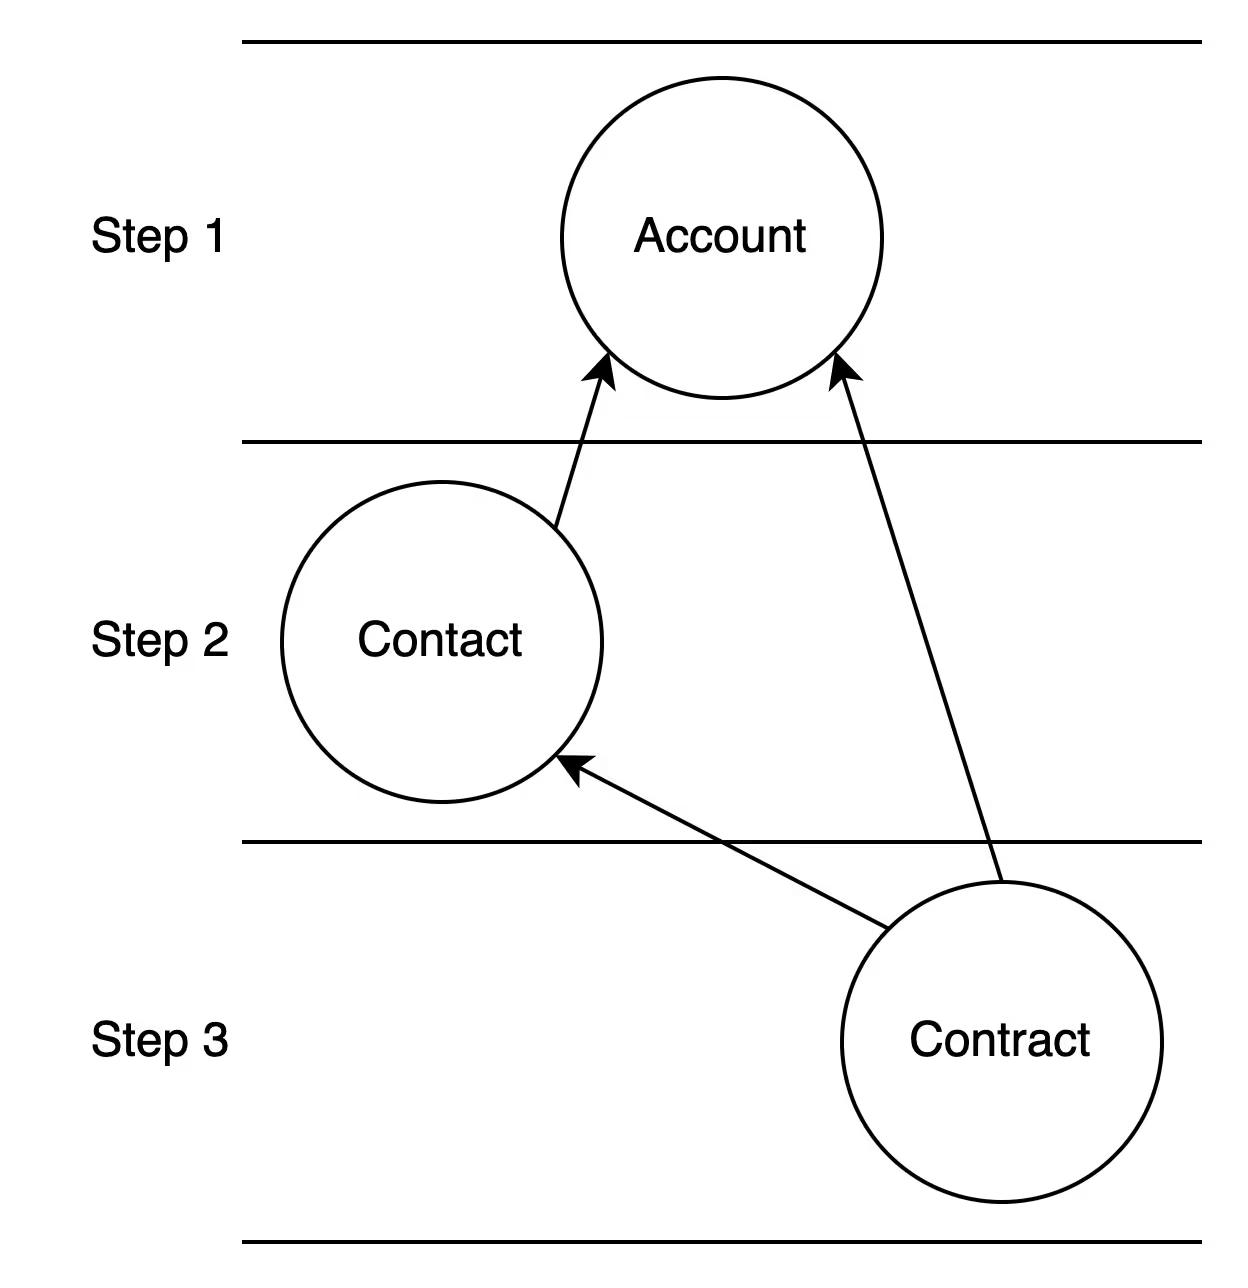
If, for example, the Contract also had a Signed By field, which was a lookup to the Contact, the order could look like this:
In some cases, you might encounter circular dependencies. As an example, an Account might have a Primary Contact lookup. To handle this, you need to upload the parent record, then its related records, and after that, update the parent record with IDs from its related records.
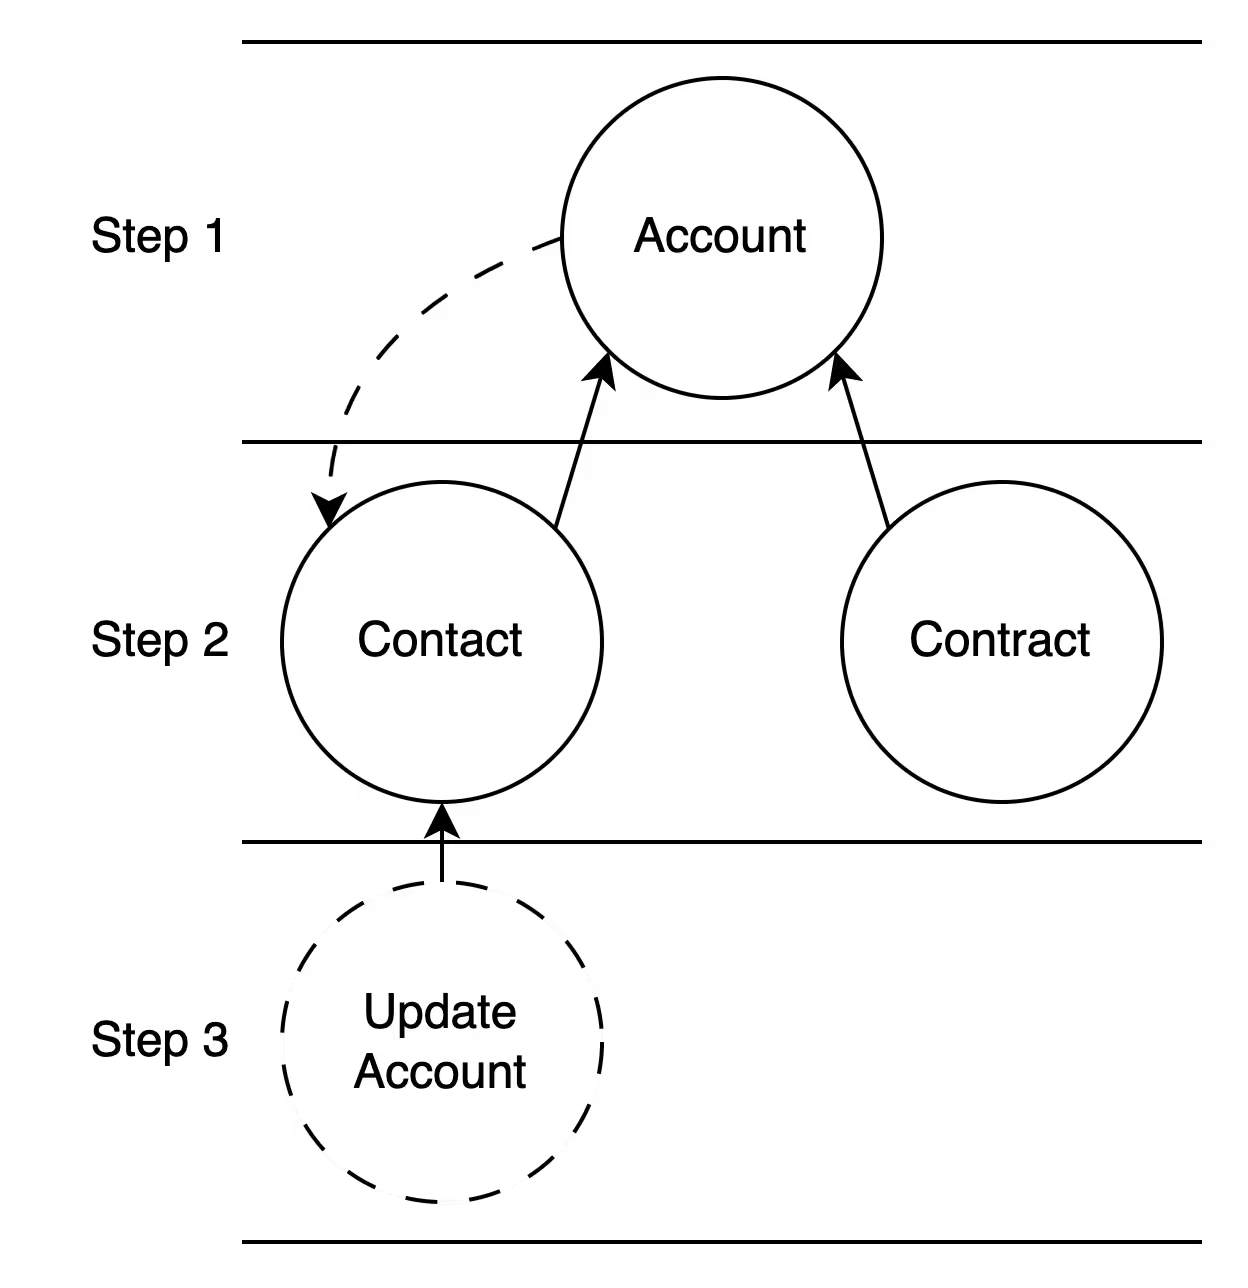
Generally, the more steps there are, the easier it is later to debug and amend the whole process, as you can branch off at any step. But, at the same time, more steps equal more time to complete the task, and more room for error (especially if the step requires human actions).
- While separating data into tables, keep the connections between related records using a unique field
You could use one of the existing fields (e.g., email or name), but they may have duplicates you are not aware of, or your data just doesn’t have matching fields.
One of the data migration best practices and a reliable way would be to introduce a migration ID – a unique text+number identifier. The number will guarantee uniqueness as it will be automatically generated, and text will make it human-friendly (e.g., Account-000001).
Migration ID is needed only for parent records, but in some cases, you might need to upload additional records that are related to the current child records. To have it covered, try creating a migration ID for each migrated object to keep the connection between the old and new records.
In the target org, create a text field to contain the migration ID. In source data, use any available tool to generate unique values (e.g., Auto Number fields in Salesforce to Salesforce data migration).
Now, let's apply this knowledge to your data:
- First, create a migration ID field for each object in Salesforce.
- Then, generate migration IDs for your source data and separate it into tables while keeping the connection.
Accounts:
Contacts:
Contracts:
At this point, the AccountId column in the related records is populated with the migration ID of the parent record. Now you can extract inserted accounts with their Salesforce ID and migration ID, and replace them in child records tables.
Moving data safely
You have prepared your data, but before the migration, you have to make sure that it’s not going to compromise anything. Errors occur all the time, and they are an inevitable part of the process, but every developer needs to know how to handle them. The main precaution you should take if you plan to modify existing data is to create a backup. It’ll reduce data migration risks and allow you to restore the data’s original state.
Also, sometimes the error is noticeable only after the migration. In some cases, you’ll need to manually update the faulted records to fix them or even delete them completely and reupload them. To do that, you have to be able to extract only the records you migrated. Migration ID can help with this, but to make sure you can add one more field called Migration Flag, the checkbox should be set to ‘true’ in your source data only.
Lastly, depending on your Salesforce configuration, you might want to disable any related automation to omit validation or limit errors.
Populating System Fields
You might want to set up certain system fields on migrated records, e.g., Created Date or Owner. Keep in mind that you should do it before uploading the data. Also, make sure to provide the Salesforce user who performs the migration with all the required permissions.
Act 4. The data migration
With the right data migration tools chosen, with the action sequence in mind, and with troubleshooting steps in direct reach, you are now ready to perform the migration.
You can first take a small set of records and run them through the process to test it and to confirm that, indeed, all records are being uploaded, corresponding fields are populated with correct values, and related records are linked
During this, you should consider the edge cases that may appear:
- What if there’s no email?
- What if there’s no company name?
- What if the date is in the wrong format?
etc., and find a business logic-based solution to them.
The number of edge cases you will encounter depends on the data quality. The cleaner the data, the fewer unexpected issues and data migration risks you will get. Still, during the QA/UAT phase of your data migration, you’ll usually discover that there were business cases you missed, but that’s also a part of the process. What matters most is your ability to cooperate with the business-oriented part of your team.
Salesforce data migration checklist
As a bonus, here is a checklist for you to be all set to perform a successful data migration in Salesforce:
- Select the right data migration tool;
- Create a backup for the data;
- Create migration IDs for our source data;
- Structure and map the data to match the Salesforce data model;
- Set the migration flag and system fields on your records;
- Disable Salesforce automation if needed;
- Upload the records from Step 1 (see Troubleshooting section);
- Extract the uploaded records with IDs;
- Populate lookups for related records;
- Repeat the three previous steps until all records are uploaded;
- Check the results;
- Enable SF automation if needed;
- Pass to QA for testing.
Salesforce data migration services
As you learned from our article, having the right data migration strategy, tools, and testing can help your team avoid common data migration challenges and make the process smooth and predictable.
At Noltic, we provide end-to-end data migration services backed by years of project experience. Our certified specialists help you define the data migration scope, prepare a reliable Salesforce data migration plan, and execute it using proven Salesforce data migration best practices. Our team ensures accuracy, quality, and confidence at every stage of migration.
If you are planning to perform data migration in Salesforce, whether it’s a small Salesforce data import or a large transformation project, you can partner with us. As a Salesforce Summit Consulting Partner, we have delivered 140+ projects across industries, gained 400+ Salesforce certifications, and know how to align technology with your business goals.
FAQ on Salesforce data migration
How long does data migration take?
The duration of a Salesforce data migration depends on several factors: the number of records, the quality of the source data, the complexity of the Salesforce data model, and the tools you use. A simple Salesforce data import with a few thousand records can be completed in a few hours, while a large migration with multiple objects, custom fields, and automation may take weeks. A well-defined Salesforce data migration plan and early testing usually reduce unexpected delays.
Which is the best approach for data migration?
There’s no single “best” approach, but following a structured data migration strategy is key. Start by analyzing your data migration scope, designing mappings between the source and Salesforce data model, and using reliable Salesforce data migration tools like Salesforce Inspector or SFDX Data Move Utility. Always run a pilot migration to validate your assumptions, then scale up. Combining automation with manual quality checks is considered one of the best practices for data migration in Salesforce.
What does a data migration specialist do?
A Salesforce data migration consultant or specialist manages the entire process of moving data to Salesforce. Their role includes assessing data migration risks, creating a Salesforce data migration strategy, choosing the right data migration tool, building mappings, and running quality checks. They also handle exceptions, such as duplicates or missing data, and ensure compliance with security standards. In short, a specialist is responsible for delivering accurate, secure, and efficient Salesforce data migration services.
How is data migration planning done?
Data migration planning starts with a detailed review of the existing data and the future Salesforce data model. Next, the team defines the data migration scope (which objects and records will be included), creates a mapping of fields, and documents transformation rules. A Salesforce data migration checklist is then prepared to cover backups, test runs, and validation. Good planning minimizes data migration challenges and ensures that business processes aren’t disrupted during the migration.
How do you perform data migration testing?
Data migration testing is the process of validating whether the migrated data in Salesforce is accurate, complete, and functional. It usually involves comparing sample records between the source and target systems, checking that relationships (like Accounts linked to Contacts) remain intact, and confirming that formulas, workflows, and reports still work. Testing is an essential step in any Salesforce data migration strategy, as it helps uncover errors early, reduces data migration risks, and ensures the system is reliable for end users.
together


